This is my true story of replacing worn-out wheels on the seat of my Hydrow rower. I am not taking responsibility for any injuries or damage incurred by anyone who uses this information to attempt the same.
What I needed:
- 5mm allen wrench (see note below about length)
- 10mm box-end or crescent wrench (monkey wrench will do)
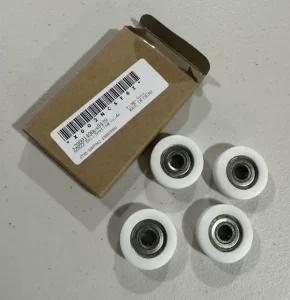
- Replacement wheels (uxcell 608ZZ Ball Bearing Guide Pulley Roller Round Wheel 8x32x12mm)
- Large Phillips and/or Slotted Screwdriver
- Blue LocTite (if you really want to do it right)
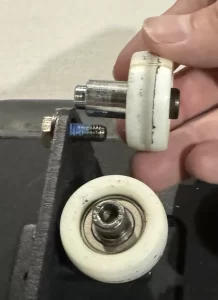
Hydrow seat wheels developed cracks
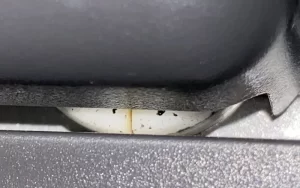
A few weeks ago, I started becoming acutely aware of how rough my Hydrow seat rode along its track… like a train bogie hitting a join on a railroad track. I looked at the wheels carefully (at least, as carefully as I could with the seat still in place) and saw that three of them had split completely.
My machine has just over 1 million meters rowed and is a few years old. I contacted Hydrow support for help, and they asked me to provide all sorts of information about when I bought the rower and where I got it from. I did the best I could, but this is an old rower (I think I was an early adopter) and there was no chance that this was going to be a warranty claim.
The person at Hydrow customer support said I needed a new seat. Those are for sale from them for $150. Crazy. There was nothing wrong with the seat I had, except that the wheels needed replacement. And, since the wheels are a wear item, it seems like wheels should be something they’d sell me. Thankfully my car dealership doesn’t tell me I need a new wheel when I need my brake pads changed.
I took my story to the Hydrow Facebook group and asked if anyone knew the specs for these wheels. I got some friendly responses, and a user named Michael Maloney came through with an Amazon link to exactly the thing. $12, or to put it another way, a hundred and thirty-eight dollars less than Hydrow’s fix. I decided to go with that plan.
It took me about twenty minutes to do this swap, and I photographed each step so that if you want to try it (and again, I am absolutely not taking any responsibility for whatever injuries or property damage you might manage to cause), you at least know what’s involved.
Remove the back plate
Step one is to slide off the plate at the very end of the track by pressing the center and pushing it downward (toward the floor).

Unscrew the rear cap
Two pretty obvious screws present themselves when you get that plate off. You need to unscrew these and remove them so that you can slide the seat off the track.

Clean the Track!
You should be wiping any accumulated dirt out of the seat track periodically, but a really good time is when the seat is off. Remember to get the upper lip and inside of the track at the same time.

Which Wheels?
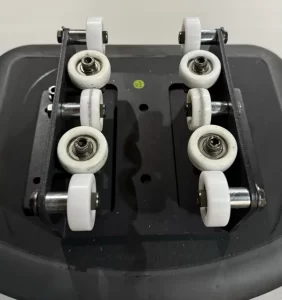
I didn’t really know how many wheels I was going to find when I took the seat off, but for anyone who guessed TEN, you are ahead of the game. Now, the wheel set that I bought from Amazon included only four wheels, but as I’ll explain below that’s really all I needed. I elected to replace the four on the ends (three of which, as you can see from this photo, were split).
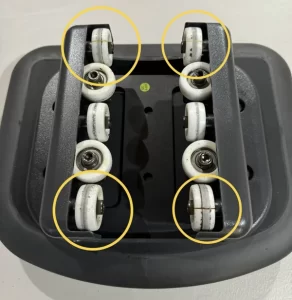
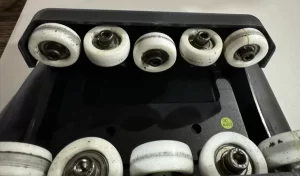
The side view (below) shows better how the wheels are oriented. Remember as you look at this that the seat is upside-down in these photos, so the wheels that seem highest are actually the lowest ones.
The two wheels on the ends (the front and back, as it were) are the wheels that roll on the bottom of the track and bear the weight of the rider (I was going to say rower, but since the machine itself is also called a rower, that seems confusing). So those four wheels (two to a side) are the ones that are going to wear fastest.
The wheels in the center (one to a side) keep the seat from binding on the top of the track if your rowing motion somehow causes the seat to lift. Since there’s some wear on those two wheels, I guess that it happens sometimes.
Finally, the two wheels on each side that are oriented horizontally are there to keep your seat centered as you move back and forth. These are also not weight-bearing, so should last longer than the wheels on the ends.
Remove the Cover (Housing)
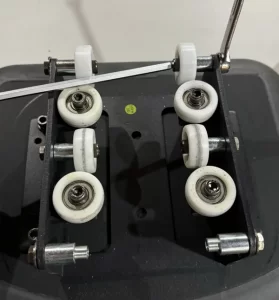
It looks like you could just unfasten the wheels with your 5mm allen wrench and skip removing the cover, and you can try it, but for reasons that will be explained below I had to take the cover off. This involves removing four screws. (Sharp-eyed viewers will see that this photo was actually taken during re-assembly and not dissasembly, as the shiny new wheels are evident.)

Remove the Wheels
This part can be a little more challenging. For one thing, it’s easy to have an Allen wrench that is too long for the job. My handy all-in-one Allen wrench set wouldn’t let me get the opposition I needed to unfasten these bolts. I ended up using a longer wrench I had with one of those fancy rounded ends and it did the job just fine.
Another challenge I ran into was that although a couple of the bolts came off with no trouble, for the others the bolt that loosened was the one holding the axle to the seat frame and not the one holding the wheel to the axle. It was literally 50/50. If the wheel and axle come off together, you’re going to have a little more work to do.
Finally, all the bolts (wheel side and frame side) have a bit of LocTite on them, so some force is needed to get them started.
It almost never happens that a project can go off with out any problems at all, and for this project the hiccup were the wheels that unscrewed at the frame end of the axle instead of the wheel end.
To the Vice!
To get the wheels off the stubborn axles, I used my bench vice. Something like vice grips would probably work, too. It shouldn’t matter if the axles get a little scuffed because they don’t need to be smooth (except at the ends where they are inserted into the seat frame and the wheel).
If you do get into a situation where the axle detaches from the seat frame, keep track of which end of the axle is which — it is asymmetric. If you try to insert it into the seat frame backward, you’ll never be able to tighten it… should be pretty obvious.

New Wheels!
The link is above. The replacement wheels come four to a set, so you will need multiple sets if you plan to replace more than just four wheels.
Attach New Wheels and Reinstall
The new wheels go on exactly as you’d expect. If you want that factory feel, use a bit of LocTite on the threads the way Hydrow does.
Re-assembly is pretty much the opposite steps you used get this far, but I’ll list them here:
- Install new wheels
- Attach housing (wheel cover) with four screws
- If you didn’t wipe off the track before, do it now.
- Slide the seat back onto the rail. Make sure you have it pointing in the right direction — it is possible to put the seat on backward, and you’ll know you did when you sit down and try to row.
- Attach the end cap to the rail using the two screws you removed before.
- Slide the end plate on.
Happy Rowing!
Thanks again to Michael for sending me the link to the wheels I needed on Amazon.